There are times of the year when certain spices are abundant and thus come very cheap. There even was a day in 2010 that a sack of onions would just sell for around 350 pesos in my province. For many farmers and entrepreneurs who got opportunity to invest on spice processing, it would be a good idea to invest on making powdered onions, garlic and chili and make a good business about it.
Here is a guide how to make powdered onions. You can try this for your home use, and scale it up commercially if you think it is feasible.
Ingredients you need:
* Onions
How to prepare:
1. Peel and finely chop the onions.
2. Spread the onion pieces out on a tray and heat in a 150 degree oven or in a food dehydrator until dry or even under the sun if it is summer. You will know the onions are dry and ready if you can easily crumble the chopped pieces in your hand.
3. Let the onions cool. When cooled, grind with a coffee grinder, spice mill, food processor or mortar and pestle until you reach your desired consistency. You can sift the material in a strainer to separate the chunks from the fine powder.You can use a much larger grinder or food processor if you decide to go do it commercially or in large scale.
4. Store your finished onion powder in an air-tight container in a cool, dry spot or freeze. If you do it commercially, you can ask for an advice for proper packaging from DOST including where to purchase packaging bottles suitable for the product.
Similar procedure can be done for garlic and chili.
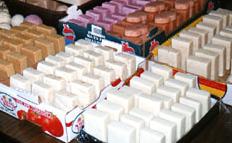
Many big soap businesses today started small, some just as hobbies done in kitchens; and as a marketing strategy, the soap were given away to friends as sample - until the market, an established business, friends etc., choose the soap product, thus creating demand and making the soap popular; as a result the small entrepreneur needed to expand, produce more soap, create a brand and so on and so forth. What made the soap a success? Many reasons and certainly includes quality, price, packaging, creative marketing etc.
Before going into a small scale soap making business, learn the basics first. Remember, this is the basic approach and you can modify this, you can remove or add an ingredient etc. The important thing is you learn basics how to do it - add your creativity, who knows you could come up with a hit product with a soaring demand.
How to make soap by cold press
Product: White creamy laundry bar soap with the essence of citronella or other suitable essential oils.
Materials:
Coconut oil (primary) Caustic soda (35 Be) as saponifying agent Sodium silicate as soap builder
Essential oils as perfume Equipment:
Cylindrical soap mixer, pedal type (16 liters) Moulder with cutter (71.5 cm. x 38 cm. x 3 cm.) Oil storage container, 20 kg. capacity Percolator, 1 gallon capacity
Procedure: Five liters coconut oil is measured and transferred to a steel cylindrical soap mixer. A volume of 2.3 liters of caustic soda is slowly added to the oil with stirring for 20 minutes. 0.25 liters of sodium silicate and 0.02 liter essential oil are added and continuously mixed and stirred for 10 minutes. The homogenous viscous soap mixture is poured into the moulder and is made to stand for seventy-two (72) hours at room temperature to complete saponification. The soap is extruded from the mould and is divided into bars by passing through a wire cutter. Soap bars are packed in polyethylene bags then into boxes for storage.
Source: Technology developed by: Industrial Technology Development Institute (DOST) , photo courtesy of millersoap.com
Ginger is a spice which is used for cooking. It also used as a delicacy or medicine, it can even be used in making ginger beer. It is the underground stem of the ginger plant, Zingiber officinale.
The characteristic odor and flavor of ginger root is caused by a mixture of zingerone, shogaols and gingerols, volatile oils that compose about one to three percent of the weight of fresh ginger. In laboratory animals, the gingerols increase the motility of the gastrointestinal tract and have analgesic, sedative, antipyretic and antibacterial properties.
We have a procedure how to farm Ginger in Filipino. Here is the link: Ginger Farming.Intercropping Ginger with Coconuts
Ginger can be grown in sandy loam, clay loam, and lateritic soils, provided that the soil is at least 30 cm. deep and there is enough rainfall and good drainage in the area.
Preparing the seed pieces:
1. Select fresh and healthy seed pieces weighing at least 20 grams each and showing signs of early sprouting.
2. Before planting, wash the seed pieces in running water. Then soak them for 10 to 15 minutes in a solution of acidulated mercuric bichloride (for every 20 liters water, add 45 grams captan).
Land preparation:
1. Prepare raised beds one week before planting to ensure good drainage. Beds with two rows should be about 30 cm high and less than two meters wide. Row lengths depends on the farmers convenience. When beds are located in areas with high occurrences of soil-borne diseases, such as damping-off, the beds must be sterilized by burning dried rice straw, banana leaves or coconut leaves three times on the soil surface.
2. Plant the seed pieces about five cm deep in each hill 25 cm apart in double row in each bed. Arrange the hills in a triangular pattern, whether the seed pieces are planted in poorly drained areas or areas. When planted under coconut trees, the seed pieces should be planted 25 to 20 cm in shallow furrows 45 cm apart.
3. At the time of planting, fertilize the soil with complete fertilizer (12-24-12), 400 kg. if soil is sandy, 300 kg. if soil is clay-loam per hectare.
4. After planting, mulch the beds or ridges with green leaves (either ipil-ipil or madre de cacao) or rice straw, 10,000 kg./hectare, to prevent the soil from drying and to prevent erosion caused by monsoon rains.
5. During the second and fourth months of growth, apply fertilizer again. Generally, they should be weeded at least twice during its growth period.
Harvesting:
Ginger should be harvested when the leaves become yellow and start to wither. This occurs eight months after planting.
6. In small harvesting areas, the crop is dug with a spading fork, the plant is pulled out, shakes off the soil and lays them on the bed. Stems are cut off without breaking the ginger bulbs.
7. In large plantation areas, ginger is harvested by harrowing the soil, then dried an open shaded area.
Source: Greenfields, March 1990; and http://elgu2.ncc.gov.ph
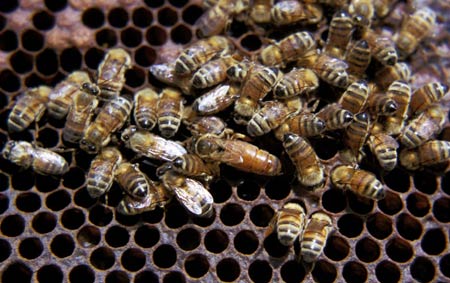
The native honey bee or the Asian honey bee (Apis cerana) are good pollinators of crops. They also produce honey, pollen and wax, all of which could be either directly used by farmers or sold in the market.
Compared with the exotic European honey bee (Apis mellifers), our native honey bees are more resistant to pest and diseases Also, colonies of native honey bees are available everywhere and so it is easy to start with one or two colonies of this kind of honey bees. Being tropical, our native bees are smaller and could produce 2 to 6 kg of honey per year while the European honey bees could yield 50 kg of honey per year. Native honey bees also have greater tendency to abscond or leave suddenly, deserting their hive.
Since 1948, there have been attempts of bee keeping of European honey bees due to several reasons; i.e. gentleness, high honey yield, lesser tendency to abscond, etc. But two major problems have limited the culture of this species. These are: (1) lack of queen bees and (2) susceptibility to mites.
Because of biological and economic considerations, native honey bees are more suitable for bee keeping by small farmers. Less capital is needed in bee keeping these honeybees. If farmers have enough resources and skills, they may try bee keeping the European honey bees.
Suitable areas for rearing native honey bees
Colonies of native bees could easily be established in areas where there are plenty of flowering plants throughout the year. Bees in these areas will practically yield more honey.
Having diversified farms, Cavite and Batangas provide good foraging grounds for bee colonies. In Quezon where coconut palms flower throughout the year, bee colonies under coconut plantations would just be alright. Mindanao is another good area to raise honey bees.
One practical method of assessing the suitability of an area for bee keeping is counting the number of wild bee colonies. If the density of bee colonies is high, it means that the area is suitable for bee culture.
Materials needed in transferring wild colonies of honey bees
1. Wooden hive
2. Frames with wires
3. Nylon plastic
4. Knife
5. Bee veil
6. Bee brush
7. Smoker
8. Ax
9. Bolo
10. Plastic sprayer
11. Queen cage
12. Bee escape
How to transfer honey bees:
Transferring wild colonies of bees to a wooden hive. Be sure that all materials are available.
Bolo or ax may be needed in exposing the colony of native honey bees. Determine the number of combs in the hive. Spray worker bees with small amount of water to prevent bees from flying. A little amount of smoke is needed to drive worker bees away from the first comb. By means of a sharp stainless knife, cut the base of the first comb. Oftentimes, this comb does not contain brood (immature bees) or honey. Using water and smoke, do the same to the other combs.
Fix the comb with capped brood (pupal stage) on the center of the wired frame. To do this, cut evenly the base of the comb. Place the comb below the wired frame and cut through the middle section of the comb by using the wire as guide. Now, could push half of the comb through the wires. Tie the comb to the top bar by means of a plastic straw. Bees will begin to cluster outside the combs because of the disturbance. Occasionally, examine this cluster to see if the queen is with them. One or two combs with capped brood is enough for the new hive depending on the total population of the feral or wild colony. Be sure that the comb attached to the frame would be totally covered by bees after the operation.
Now, look for the queen bee. Among the bees in the colony, she has the longest abdomen. If you find her, grasp her wings gently with you two fingers. Do not hold her on the abdomen. Put the queen bee on the cage together with five newly emerged worker bees. After covering the cage, tie it below the top bar adjacent to the comb. With the queen bee and two combs on the box, you are now ready to transfer all bees to the box. Give the queen bee a handful of bees. Some of these bees will guide the remaining bees to the new hive. Apply some smoke to the cluster of bees remaining in the old hive to facilitate the process of bee transfer. After all bees have transferred, bring the box to the desired location.
Transferring a swarm to the box
Bees on swarm are gentle because they have no honey and brood to protect. Wear a bee veil. One could not determine if bees are aggressive or not, this can protect you from bee stings. Look for the queen bee and put her on a cage. Place the queen cage on the center of the box. Be sure that one or two frames have wax strip. You may release the queen bee after four days.
Swarm on leaves or small branches can be shaken into a box containing frames with wax strips.
Transferring honey bees from concrete walls
Some bee colonies may be found in structures which could, not be moved or destroyed for some reasons. In this situation, bees could be forced to transfer to a box by means of a bee escape.
Be sure that there is only one small hole in the feral colony. By means of a sealant, attach the bee escape to the wall to cover the entrance. Bees could get out but they could not get in. Place the box with frames near the entrance. One frame in the box should contain a piece of old comb to attract flying bees.
The queen bee may transfer to the new hive on or before the fifth day. She does not need to be confined in the cage.
Management of newly transferred colonies
1. Newly transferred colonies are always under stress because of disturbance. We could describe the colony condition as abnormal.
2. Place all boxes on wooden benches 18 inches or more from the ground. Shaded or partially shaded areas provide good location for bee colonies. Apply grease on the legs of benches to prevent ants from attacking or robbing bee colonies.
3. Immediately give sugar syrup (60:40 sugar-water ratio) to the colonies. This will enhance building of new combs.
4. Limit the entrance hole to prevent robbing or drifting of worker bees.
5. Release the queen bee after four days. By this time, new combs have already been built.
6. Examine all colonies for larvae of wax moth. This is the most common pest of brood. Newly attacked combs usually have small holes on their midrib. They may also contain tunnels of larvae. If any of these symptoms appear, remove all combs after putting the queen in a cage. Give the colony new frames with wax strips and continue feeding. Place the infested combs on a freezer to kill all eggs and larvae of the pest. After 72 hours, these combs could be given back to the bees.
7. Absconding (or desertion of the hive by bees) is usually caused by wax moth infestation of the brood. Absconding is a natural behavior of native honey bees. It is actually a defensive strategy of the bees. Be sure that swarm traps are always in their proper places. Once the colony becomes strong, they could guard the brood against wax moth.
8. At least three combs should have cells with sealed honey. The presence of sealed honey increases the morale of the colony.
Swarming
Swarming is normal among native honey bees. It is one way of increasing their colonies. Since you could not stop this annual activity of the bees, be sure that your swarm traps are hung on branches of nearby trees. Melted bees wax should be applied on these wooden traps to attract swarming bees.
Provide one or two combs of capped brood to the new hive. Shake the bees into the new hive. This could be done with a jerk to cause the bees to slide from the swarm trap.
Construction of bee hives
There are many kinds of bee hives. Traditional hives in the Philippines are usually made of hollow trunks of trees or palms. Ends of these hollow materials are usually plugged with stones or wood. The movable-frame hives are recommended for easier manipulation of combs. Oftentimes, combs have to be inspected to determine the condition of the hive.
Thickness of the wood or bamboo may vary but the internal dimensions must be followed strictly. The most important dimension is the distance between side bars or top bars since the bees always maintain a natural distance between combs. This is called bee space. Width of side bars should be 27 mm.
How to melt bees wax
Wax should be extracted from old and new combs. A cheap solar wax melter could be assembled for this.Wax strips instead of wax foundation.
A locally assembled wax container is submerged in hot (but not boiling) water. Dip a marine plywood twice on the metal containing the melted wax. Be sure to moisten the plywood with soap solution before dipping. Peel off the wax after five seconds. Cut wax sheets into strips for future use. Place the wax strip on the center of the top bar. Use melted wax to glue the wax strip on the bar. Embed wires with melted wax. Bees will position the midrib of their combs on wax-coated wires.
Do's and dont's when examining a hive
Always use a hand sprayer to calm the bees. Never use smoke as advised in temperate countries. Use of smoke is appropriate in dealing with European honey bees.
Do not stand in front of the hive. You may be blocking the pathway of bees.
Always wear bee veil. Bees tend to cause bee sting near the eyes. If you are stung, apply weak acid after removing the bee sting from your skin.
Place uncapped brood near the center and capped brood towards the sides.
Cut old and brittle portions of the comb. Queen bees love to lay eggs on new combs.
Always examine for the presence of wax moth larvae, especially during the rainy season.
Remove combs not covered by bees. Store them in airtight containers containing moth balls.
Splitting the colony
Strong colonies will divide naturally through swarming. You may divide a strong colony by placing the queen bee and four or five frames of bees in another box. Shake some bees into the second box. Transfer the second box to another location; the farther, the better. Older bees will return to the first box.
Without a queen bee, bees in the first box will build several queen cells. On the ninth day, destroy small queen cells and leave the biggest one. A young mated queen bee may start laying eggs at three to four weeks after splitting the colony.
How to harvest honeyUse of honey extractor
This is an expensive device for beginners. But if your group could not put up one extractor, harvesting of honey would be more efficient. Honey extracted through this method is clean. Also, combs could be returned to the hives after processing.
Squeezing of honey combs
By means of a hot knife, cut honey combs into small pieces. Combs with brood are tied to the top bar and returned to the hive. Combs with honey are squeezed by means of a clean muslin cloth. A metal press could also be of help.
Cutting of honey combs
Combs of honey could be cut nicely and wrapped in clean plastic bags. Comb honey could also be stored in dean bottles.
Presentation of your product.Be sure to invest on good labels and clean bottles.
Source: photo from bugs.bio.usyd.edu.au; International Institute of Rural Reconstruction (IIRR) Silang 4118, Cavite, Philippines; Department of Environment and Natural Resources (DENR) Visayas Ave., Diliman Quezon City, Philippines; Ford Foundation (FF) 6th Floor, Doarcisa Bldg. Paseo de Roxas, Makati Metro Manila, Philippines; ISBN: 0-942717-31-7
Activated Carbon from coconut shells, a by-product of copra processing, is a good material for activated carbon/charcoal production. Activated charcoal (charcoal activated with CO2, water vapor, or chemical compounds) made of coconut shell has advantages compared to other materials (wood, rice husk, corn cob) because of its ability to absorb color or aroma. It is used as supporting material for food and non-food industries (processing of cooking oil, sugar, and chemical matter purification). Generally, coconut production at farmer level is 1 ton/ha, with coconut shell by-products of 0.9 ton, which in turn can yield 0.36 ton of activated charcoal. Price of activated charcoal is US$440.00/ton.
Processing of activated charcoal
Materials and equipment:
Coconut shell Drum or burning sink Oven Plastic pail Crusher wood/iron Draining tray Distilled water Sieve, 100 mesh
Methods:
a. Separate and clean coconut shell from other materials, such as coconut fiber or soil. b. Sun dry. c. Burn dried coconut shell at burning sink or drum at 300-500 oC for 3-5 hours. d. Soak charcoal in chemical solution (CaCl2 or ZnCl2 25%) (Calcium Chloride or Zinc Cholride 25%) for 12-18 hours to become activated charcoal. e. Wash charcoal with distilled/clean water. f. Spread on tray at room temperature to be drained. g. Dry in oven at temperature 110 oC for 3 hours. h. Crush or refine activated charcoal with crusher wood/iron into size of 100 mesh. i. Pack activated charcoal in plastic.
Source:www.agnet.org, photo courtesy of http://img.alibaba.com