Sep 30, 2018

How to Start a Pawnshop Business

Pawnbroking activities in the Philippines are governed by Presidential Decree No. 114, otherwise knowm as the Pawnshop Regulation Act. Only Filipinos may own a pawnshop organized as a single proprietorship. For partnerships and corporations, foreign ownership should be limited to 30 percent. So what's the procedure involved in starting a Pawnshop Business? 

1. CALL Bangko Sentral ng Pilipinas (BSP) pawnshop hotline, (02)524-8713, to check if the pawnshop name you want is already taken. 

2. Register your business either at the Department of Trade and Industry (DTI), for single proprietorship, or the Securities and Exchange Commission, for partnerships or corporations. The DTI is at the Trade & Industry Building, Sen. Gil Puyat Ave., Makati. In the provinces, DTI offices are in or near municipal buildings. Application forms are also available at DTI's website, http://www.dti.gov.ph. Only Filipinos may own a pawnshop organized as a single proprietorship. For partnerships and corporations, foreign ownership should be limited to 30 percent. 

3. Secure a business permit from the city or municipality where pawnshop will be located. 

4. Register with the BSP. See http://www.bsp.gov.ph/regulations/forms.htm for the complete list of requirements. These include permits from the DTI or SEC and the local government, an information sheet, personal data sheets, bank certification of at least P100,000 capital and location sketch. 

5. Pay the processing fee of P1,000. 6. It will take two to three weeks for the BSP to process your application. Make sure you open your business within six months after the application is approved or your permit will be revoked.
Source: Jamie Alarcon, Chona Galang, PDI Research, photo from www.openeyegallery.co.uk/

Sep 29, 2018

Green Beans (Pole Sitaw) Farming

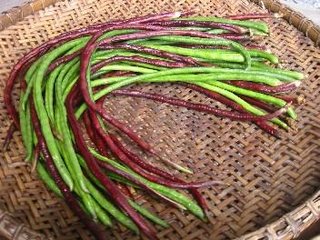
Pole Sitaw (Vigna unguiculata L.) It is known as sitaw in Tagalog, utong in Ilocano, hantak in Waray, batong in Cebuano and latuy for the people of Marinduque. I wonder how it is called in Maranao, Tausug or in Bicolano? Pole Sitao is a climbing herb crop raised basically for its pods, although shoots and young leaves are also edible. Pods are slender, 30-60 cm long and somewhat inflated with many seeds whose color depends on the variety. The crisp young pods, which have a high nutritional value, can be sauteed alone or cooked along with other vegetables. 

Varieties 

 1. CSL-19- early maturing variety, which flowers 37 to 43 days after planting. Pods are light green, crisp, smooth textured, and non-fibrous with good eating quality. CSL-19 is moderately resistant to black bean aphids and bean fly. Other light-green-podded varieties are CSL-14, CSL-15, CSL-16, PS3, and PS 1. 2. 83-0002 ? is a variety with dark green leaves, which flowers 39-48 days after planting, It is moderately resistant to bean fly and pod borer and has a high level of resistance to fusarium wilt. Pods are dark green with purple tips, crisp and non-fibrous, and with good eating quality. Seed coat is very thick. Other fark-green-podded varieties are Sandigan, CSD-4, 87-005, Acc 288, CSD-36 and 89-020. 


Climate and Soil Requirements Pole sitao is well adapted to the lowland tropics with a temperature range of 20-35C. It grows best under full sunlight although it can also tolerate partial shading. Adequate supply of water and a rich, friable, fertile soil promotes healthy growth and good quality pods. 

Planting Pre-germinate or directly sow seeds in pots or drill 2.5 to 3.5 cm deep in the plots with a distance of 30 cm. Construct trellis/stakes, 200-250 m long to support the vines after the seedlings have fully developed. Boxes, plastic twines, abaca twines or wire will also help support the climbing habit of the crop. Apply organic waste to enhance crop vigor and yield. Mulch the crop with grass clippings and kitchen waste. To minimize pest and damage, plant marigold and holy basil (solasi) in borders to repel insects. Spread grated coconut waste over the plant to invite ants, which feed on worms. Spray hot pepper extract with soap against aphids and podborers. 

Harvesting Pick young pods six to seven weeks after planting or when seeds become visible on the outline of the pod. Fresh pods left in the field becomes tough and dissolved. Seeds become swollen, which reduces yielding capacity. Harvest every 2-3 days. For marketing, 20-40 pods may be bundled. Store in a cool (8C), dry place up to four weeks. 


Source:PCARRD Pole Sitaw Production Guide; photo from www. karen.mychronicles.net

Sep 26, 2018

Onion Farming

Varieties 
Red Creole 
Red Pinoy 
Yellow Granex (Hybrid) 

Seed Establishment and Seed Sowing (Nursery) 

Seedbed should be located in a weel-drained, friable soil with good water holding capacity and high organic matter content. If soil pH is lower than 5.8 lime application is necessary at the rate of 3 tons/ha applied one month before transplanting. Land should be prepared by thorough plowings and harrowings. Level and pulverize the soil to facilitate formation of beds (1 meter wide and 20 m long.) Prior to seed sowing, sterilize the beds by burning rice straw on top or by pouring boiling water to prevent pest and disease infestation. Broadcast chicken manure or compost at the rate of 10t/ha combined with 10 bags 14-14-14. Space 10-15 cm between rows and sow seeds evenly in a row at 5-6 seeds/inch with seeding depth of 1/2 inch. Appoximately 25 grams of seeds is needed per square meter. Irrigation should be applied adequately in the field right after seed sowing. Seeds will germinate at about 7-10 days after sowing and are ready for transplanting 45 days after sowing. 


Land Preparation and Formation of Beds 

 Prepare the field by 2 plowings and 2 harrowings. Level and pulverize the soil to a fine texture to facilitate formation beds. Raised beds are constructed at 0.5 meter wide by 20 m long (maximum) by 15 cm high. Double row beds will be prepared with a distance of 20-25 cm between hills and with a hole depth of at least 3.5 cm. 

Basal Fertilization and Transplanting 

 Basal application of chicken dung or compost at the rate of 10t/ha combined with 10 bags 14-14-14 will be applied in the prepared hole and then cover thinly with fine soil. Transplant one seedling in each hole by pressing downward the base of the seedlings so that the roots will have a good contact with the soil. Irrigate after transplanting. Seedlings are ready for transplanting 45 days after sowing or when the seedlings are about pencil-size in ten diameter, has 5 visible leaves and a height of at least 15 cm. 

Side-dressing 

 First side-dressing will be done ten days after transplanting with 3 bags/ha of Urea mixed with 2 bags/ha of Muriate of Potash or approximately 15 grams Urea and 10 grams Muriate of Potash per square meter. 

Irrigation 

 Irrigation should be applied after transplanting. Weekly irrigation is done or whenever necessary. More frequent watering when the bulbs are developing. Do not irrigate 3-45 days before harvesting or when 20-30% of the plant tops fall over naturally. 

Cultivation and Weeding 

 Cultivation and hand weeding should be done 10 days after transplanting to be followed two to three times more to make sure that the weeds are checked and the plants do not become waterlogged. Hilling-up is done 3 weeks before the harvest to avoid greening of onions. 

Insect Pests and Disease Control 

Thrips. Abundant during dry season. Adults and nymphs rasp the leaf surface and suck juice from the leaf. The leaves appear slippery with sunken areas that later dry up resulting to weakened plant, reduced growth and lower yields. Examine closely some plants from 14 m perimeter of the field by pulling the leaves apart at the base. It attack is severe, employ chemical control. Armyworms. The larvae bore into the onion leaves and fed leaving the exterior almost intact. Damage is worse in weedy fields. Thorough land preparation is done to destroy the egg laying sites and feeding source. Chemical control is recommended. Cutworms. Larvae feed at night and hide near their feeding site during the day. They roll when disturbed. Purple Bloch. Fungal disease that occurs on leaves, bulbs, flowers, and survives in crop residues. Lesions start at small sunken area with dark purple center. Infection of the bulb occurs as the plant approaches maturity. A combined approach involving cultural and chemical control is necessary. Sooty Mold. Occurs generally after the bulbs have been harvested. This is favored by high temperature and humidity. Curing the Onions quickly with good ventilation is necessary. Bacterial Soft Rot. Bulbs that have mechanical injuries/bruises are susceptible. Make sure that plants are mature before harvest. Provide proper ventilation during the curing, packing and transport. Fungal spraying is done o prevent fungal diseases. Spraying starts 12 days from sowing and weekly thereafter. 

Harvesting and Curing 

 Harvest the crop as soon as the necks of the plants tends to fall down or when 75% of the stems are fallen over. Harvesting is done manually by pulling the matured bulbs. Harvesting bulbs are placed in the field for 2-3 days before bringing them to the curing house. However, if rain occurs, the bulbs should be brought immediately to the curing house. The curing house should be well ventilated and relative dry. Harvested bulbs are air-dried or cured 3-4 weeks until the neck is soft and dry (closed). Remove or cut tops with shears 1.5 -2.5 cm. from stem end of the bulbs. Do not remove outer scales. Place the bulbs on racks made of tiers of bamboo, wood or netted wire. Put the racks in a well-ventilated shed. 

Trimming/Sorting 

 Trim the onion roots and leaves right after harvest or one day after filling them under the sun. Use sharp knife or scythe and cut 4-6 cm from the bulb. Cleaning/Sorting Clean the bulbs by peeling-off the outer peelings. Arrange in crates and store in well-ventilated place free from high moisture and expose to the sun. 


Source: www.da.gov.ph, photo from pas.byu.edu

Sep 23, 2018

Coffee

"Coffee is the source of happiness and wit," said King Louis XIV who after experiencing coffee's excellent taste and distinctive aroma began to recognize the value of it. In the Philippines, the coffee industry began in 1740 during the Spanish regime. It is considered one of the high-value crops in the local and foreign markets. Coffee is among the top ten agricultural crops in terms of value. Coffee registered a total production of 123,934 metric tons valued at P6,818.84 million in 1995. Today, we are exporting to ICO and non-ICO member countries which include Japan, Singapore, West Germany, Netherlands, Malaysia, Muscat Oman, United Arab Emirates, Pakistan and U.S.A. These countries alone account for 97 percent of the total Philippine coffee export. 

AGRONOMIC CHARACTERISTICS Coffee trees require a rich, moist loose, well-drained soil best composed of organic matter, decomposed mold, and disintegrated volcanic rock; a well-distributed rainfall of about 40 to 70 inches annually with peak wet season' high humidity; seven hours of sunshine daily; and plenty of mist and moderate winds. Coffee trees vary greatly in sizes from dwarf trees to thick-trunked forest giants twenty feet or more in tropic. Generally they are restricted to areas with a medium average annual temperature of 70oF, not lower than 55oF and much above 80oF. 

VARIETIES 
Arabica is characterized by wavy leaf margin, light green leaf color, thin leaves, pulp and parchment, known as " kapeng tagalog." Yields 500-1,000 kg of clean dry coffee beans per hectare. It could be grown productively in cooler places with an elevation ranging from 1,200 to 1,800 meters above sea level. 
Robusta is characterized by large umbrella shaped growth with thinner leaves which have more wavy margins. The berries are borne in heavy cluster with the pulp and parchment. Yields 1,200 kg of clean dry coffee beans per hectare. It could be grown in areas with an elevation ranging from 600 to 1,200 meters above sea level. 
Excelsa has wide leaves that are thicker than Robusta but thinner and smoother and more rounded than Liberica with smooth edge. Young leaves are usually shiny with bronze violet color. The berries are borne in heavy cluster, varying in size and usually bigger than Arabica but smaller than Liberica. Pulp and parchment are thicker than the Leberica. Yields 1,000 kg of clean dry coffee bean per hectare. It could be grown from sea level to 600 meters above sea level. 
Liberica is locally known as "kapeng barako" because it produces the biggest berry. It is rounded and are borne signly or in small clusters. Has thicker leaves than Excelsa and twice as long as Arabica. The pulp is thick and the parchment is more woody. It also characterized a very strong pharmocopical taste and flavor. It is tolerant to drought and grows in a wider type of soil. Yields 1,000 kg. Of clan dry coffee beans per hectare. 


TECHNOLOGY 

Seed Preparation a. Coffee is grown from seeds; b. Gather seeds from disease and pest-free, high yielding trees; c. Grow coffee plants in the nursery to produce better seedlings. They nursery be located in the plantation or nearby and accessible to water supply; Three-fourth kg (i.e. 750 gm) of quality seeds is enough to plant a hectare; d. A 50% allowance of seeds must be considered for ungerminated seeds, poor seedlings and for replanting; e. Select viable seeds, stir berries in a bucket of water and remove floaters. Those that sink are the good ones; f. Remove pulp by hand or pulping machine, then soak beans in water for 24 hours to hasten the removal of mucilage; g. Wash beans and discard floaters. Air dry in well-ventilated room for least 4 days; h. Keep dried parchment in cool dry place or mix with charcoal to preserve its viability; i. Germination bed must be 1 meter wide and of convenient length. To avoid flooding, raise bed 15 cm from ground level; j. A 1 x 20 m plot can accommodate one ganta of seeds; k. Sow seeds on shallow rows at ¾ inch deep and cover with fine soil; l. Water the seedbed regularly but not too wet and partially shade plants from sunlight; m. This out and prick seedlings (transplant to another seedbed/plastic bags) or when 2-3 pairs of leaves have developed. 

Vegetable Propagation 1. Coffee can also be propagated asexually; 2. Clone is used for coffee propagation. It is a part of a plant that is made to reproduce an offspring which carries all the qualities of its parents. 3. Split lengthwise into two halves of a fingersized vertical shoot of about one foot long with 4-6 nodes to produce a clone. Partially cut leaves before splitting; 4. Set modal cutting in germination box 1x2 inches apart and 1 inch deep, then place boxes in germination chamber. Nodal cuttings will produce roots and shoots within 45 days; 5. Prick seedlings into individual plastic bags with soil. 6. Full-grown seedling with 4-6 pairs of leaves could be attained within 6-8 months; 7. Coffee plants raised from nodal cuttings bear fruits 18 months after transplanting, earlier than plants grown from seeds. 

Establishment of Plantation Intensive clearing is necessary for newly opened areas (forest area). Plow and harrow twice open field to check weed growth. Mark places where holes are to be dug. Recommended spacing are as follows: 

 Variety ARABICA Distance in Meters 3 x 1 to 3 x 2 m 2 x 2 x 2 x 3 m double row 
 Variety ROBUSTA Distance in Meters 3 x 1.5 to 3 x 3m 2 x 2 x 2 x 4m double row 
 Variety Liberica & Excelsa Distance in Meters 4 x 5 to 5 x 5.5m 

Fertilization The general recommendation for non-bearing trees in the absence of soil and tissue analysis, is an equal amount of NPK and ammonium sulfate or urea from 250-300 grams per tree per year; and for bearing trees (7 years and above) 1 kilo of 14-14 per tree per year plus ures sidedressed at the rate of 300 grams per tree per year. Non-bearing trees (1-3 years old) make shallow canal furrow 5 cm deep around the plant; place recommended fertilizer in continuous band and cover with soil. Bearing trees (7 years old)-localized placement is recommended for sloping land. Apply fertilizer in holes or trenches made around trees between outside of the crown and onehalf meter from the base. Broadcast fertilizer 0.5m for level land. 

Pruning Removal of unnecessary branches (excess, old and dead branches) and undesirable sprouts. Pruning regulates the height of the plants, facilitates harvesting and other field operations, promotes better aeration and light penetration. This is best done before general flowering or after harvest. 

Common Pests and Control Coffee Berry Borer most destructive and hardest to control. Attacks all stages of fruit after berries become mungo-size. Infested young berries turn from normal green color to yellow orange and shortly afterwards, fruit falls prematurely. Presence of empty or partially filled fruits underneath tree is a sure sign of infestation. Coffee Leaf folder larvae feed on leaves and sometime attack flowers and fruits. Adult is a small moth with light brown forewings. The eggs are laid in clusters on leaves. Development period is 5-6 weeks. Control: Collect and destroy infested berries before and after harvest. Pick up all berries, including those that fall on the ground, to eliminate breeding and feeding sites of insects. Spray Endosulfan at recommended rates at 14 to 21 days interval or 4 to 5 times spraying during fruiting season. The first spraying should be done when the berries attain the size of a mungbean seed. 

Common Diseases and Control Coffee Rust the most prevalent and destructive disease of coffee, Small, yellowish spots appear on lower surface of leaves; as spots enlarge, powdery yellow to orange spores are produced. Affected leaves drop and tree may die. To prevent, use resistant strains, spray susceptible varieties with copper fungicides at 2-3 week intervals at start of heavy rains. Die-Back is characterized by drying of branches and twigs from to and downwards. Appearance of spots with concentric lines on both surfaces of seedlings, twigs, and berries. If severe affected, leaves fall, twig and branches dry. To control, maintain vigor of trees by fertilizing with the right kind and amount of nutrients at proper time; regulate plant growth to prevent overbearing by pruning and/or shade. 

HARVESTING Maturity of berries is 6 to 8 months after blooming but varies on the environmental factors from region to region. In Mindanao, Arabica flower in January to May and berries are harvested in August to December. In Luzon, coffee trees bloom just after the first heavy rains in May and June, Arabica and Robusta berries are harvested in late December to March; Excelsa and Liberica later. Individually pick berries (i.e priming) to avoid presence of pedicels. For quality beans, harvest only matured berries (i.e. berries turn red from its ground color.) 

Transplanting Coffee seedlings are ready for transplant when 6 pairs of leaves have been fully developed and with no lateral branches yet. Dig holes and transplant in the field at the start of the rainy season. This will give sufficient time for young plants to establish roots before dry season sets in. Dig hole wide and deep enough to accommodate ball of earth with roots intact. Return topsoil in the hole, then add tablespoons phosporous fertilizer, and mix thoroughly. Source:www.da.gov.ph;photo from 

http://www.satoyama-net.com

Sep 20, 2018

How to Make Gelatin From Seaweeds

Seaweeds must be harvested from the sea very early in the morning or while the tide is still low.

How to make Gelatin from Seaweeds 

Procedure: 

1. Wash the seaweeds very well, drain and dry (Spread over a wire or bamboo screen for the purpose) for a week. 
2. To remove the fishy odor and taste, soak and dry the seaweeds in fresh water for 5-10 minutes, and dry again in the sun until it becomes dirty yellow in color. 
3. Bleach in 1 liter water with 1 tbsp. vinegar until it turns olive green in color. 
4. Put again in the sun until it turns light brown. How to extract agar: 
5. Put 1 kilo dried seaweeds in 1 liter water with 1 tbsp. vinegar (or, more effective, in - 3½ liter water) 80 ml. 0.1 N sulfuric acid (H2SO4) 
6. Boil and constantly stir for 1 hour. 
7. Strain in muslin cloth while hot. 
8. Allow to cool in room temperature for 5 hours. 
9. When it has hardened, slice into desired sizes. 
10. Put in ice sprinkled with salt for 2-3 days, or in a freezer overnight. 
11. Next day, thaw the frozen seaweeds and allow to dry. 
12. Put again in the sun until the desired is attained. 
13. When it cools, it is then ready to cook or bring to market. 


Source: PCARRD Monitor, August 1987; photo from www.ciadvertising.org